This guide has been developed to help users work within STAR (Study Tracking and Analysis for Research) at Penn State.
A printable PDF version of the guide is available in Sharepoint (Penn State Access ID login required).
Jump to topic
Search
Getting STARted
The purpose of the Getting STARted User Guide is to provide the user with general information and knowledge about STAR (Study Tracking and Analysis for Research). Detailed instructions are provided for login and navigation. A glossary of terms is also provided.
For questions, comments, and concerns about use of the STAR system, or to set up a training session, users should contact the STAR Team.
For IT issues, such as installing Google Chrome, help with pop-up blockers, etc., users should call the IS Help Desk at 833-577-4357.
Google Chrome is the recommended browser for STAR. Users who do not have Chorme should call the IS Help Desk for assistance in downloading the approved version of Google Chrome.
STAR is a centralized, comprehensive, web-based system designed to facilitate the submission, approval, and management of select clinical research studies within Penn State Health Milton S. Hershey Medical Center and Penn State College of Medicine. It is part of Penn State’s Centralized Application Tracking System (CATS) and is integrated with IRB.
Benefits of STAR include:
- Single, comprehensive application for all reviews, which reduces redundancy and routing delays
- Online status information providing system transparency
- Online process tailored to specific user roles
- Immediate and continuous online access to clinical research studies, budgets and visit schedules
A clinical research study must follow a defined workflow within STAR to become active and able to enroll participants. Each box in this graphic represents a study status, described later in the Glossary of Terms.
The STAR webpage provides comprehensive information, including access, features, updates and tips, as well as an extensive library of training materials.
STAR recommends that users of all experience levels review and consult the page regularly.
Enter Penn State Access ID (abc123) and password. This user ID and password serve as the first layer of protection. WebAccess uses these to confirm that the user is authorized to access STAR.
Next, users will be directed to Penn State’s Duo two-factor authentication system (2FA), where users are prompted to provide a second form of authentication. Any device enrolled in 2FA (cellphone, landline, tablet, or hardware token) can be used to confirm identity and complete the STAR login process.
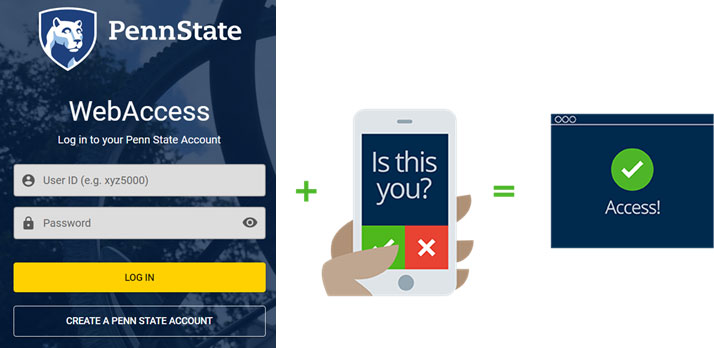
A Penn State Access ID is automatically created for all University employees; however, those who have not already activated their account will need to do so prior to using STAR.
For questions or to enroll in Duo two-factor authentication, visit get2fa.psu.edu.
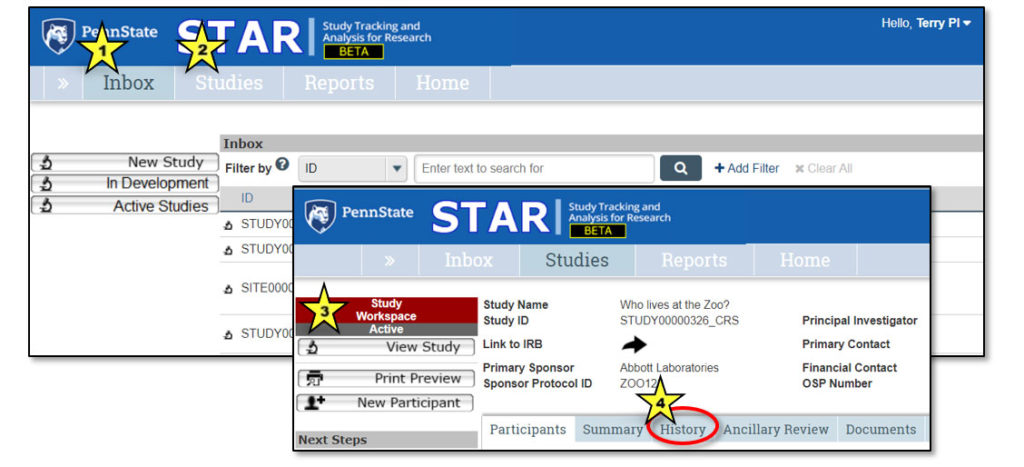
Upon logging in to STAR, users land in the Inbox. Here, each user can see all studies that currently require their action or attention. It is not a list of all studies that they may access.
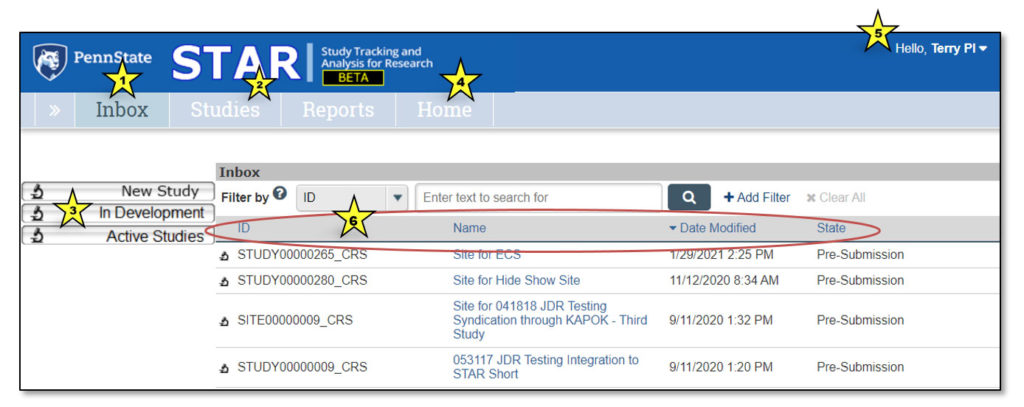
1. Inbox
Clicking “Inbox” will return the user to this page.
2. Studies
This lists all STAR studies the user may access.
3. Quick Access Links
- New Study: Links to IRB to begin a new clinical research study
- In Development: Links to the Studies page and opens the “In Development” tab
- Active Studies: Links to the Studies page and opens the “Active” tab
4. Home
This contains current STAR updates and information and a link to the STAR webpage.
5. Username
This displays the user’s name (in the case of the screenshot above, “Terry PI”).
6. Study Info
- ID: STAR study ID, which is the same as the IRB study ID
- Name: Clicking on any study name will open the study workspace
- Date Modified: Date the study was last modified
- State: Current study status
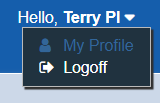 To log off of STAR, users must click the arrow to the right of their username. This will expose the Logoff option.
Do not simply close the tab or browser page – this does not log the user out of STAR. Users must click the “Logoff” button to log off.
The Studies Page allows users to view all of the studies that they may access. It contains tabs that categorize studies into various states in the workflow (e.g., pre-submission, in development, etc.).
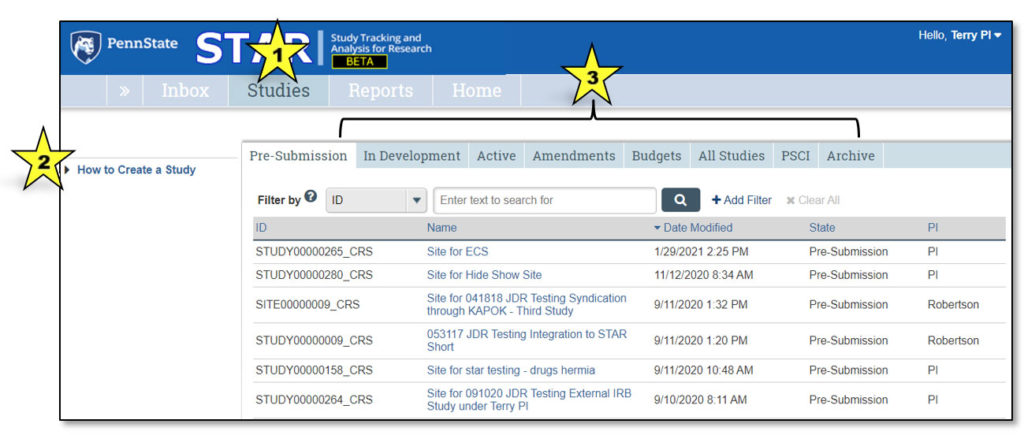
1. Studies
This indicates that the user is viewing the Studies page.
2. How to Create a Study
Clicking “How to Create a Study” takes the user to a page that explains the process of creating a new clinical research study.
3. Studies Tabs
Clicking on each of these tabs will allow the user to view studies that fall under each category:
- Pre-Submission: Studies initiated by the study team, but not yet submitted to CTO for review
- In Development: Studies being processed by CTO
- Active: Approved studies
- Amendments: Amendments to studies
- Budgets: Study budgets
- All Studies: All studies the user may access
- PSCI: Penn State Cancer Institute studies; PSCI studies appear only under the Pre-Submission, PSCI and Archive tabs, as applicable
- Archive: Closed studies that have been archived
Clicking on a study name will open the study workspace for that study. It is here that all activities related to study management originate.
A “workspace” is a section of STAR which focuses on a particular topic. Items related to the topic can be viewed and/or edited in the appropriate workspace. The workspace name will be displayed in the upper left corner of STAR. Each workspace will be displayed in a different color. Workspaces include:
- Study Workspace (red)
- Budget Workspace (green)
- Participant Workspace (purple)
- Visit Schedule Workspace (teal)
- Visit Workspace (pink)
- Invoice Workspace (orange)
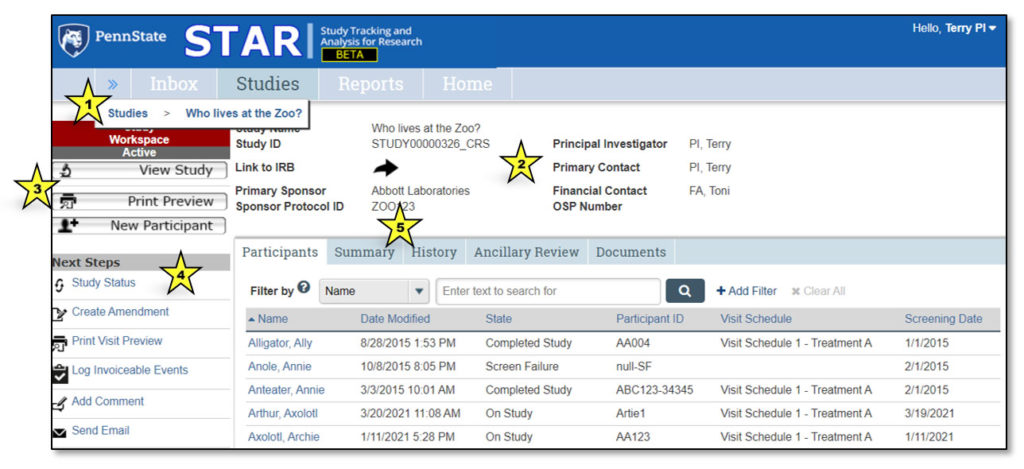
1. Studies > Who lives at the zoo?
This is a “breadcrumb trail” navigation aid. Click the double arrows to expose the breadcrumb trail.
2. Study General Information
This area contains general information about the study, including: Study Name, Study ID, Link to IRB (to gain access to study protocol and consent), Primary Sponsor, Sponsor Protocol ID, Principal Investigator, Primary Contact, Financial Contact, OSP Number.
3. Study Actions
Actions that can be performed by user – will vary based on study state.
4. Next Steps
Activities that can be performed related to study workflow. Buttons will change based on state of the study. See the “Next Steps” section of this user guide for a complete list of activities and their functions.
5. Study Workspace Tabs
Provide information about the study:
- Participants: Information about each study participant
- Summary: Summary information about the study
- History: Log of all actions that have been performed on the study
- Ancillary Review: Tracks requests and responses for ancillary review(s)
- Documents: Displays attachments related to the study
The main study workspace contains five tabs.
Participants Tab
Information about each study participant.
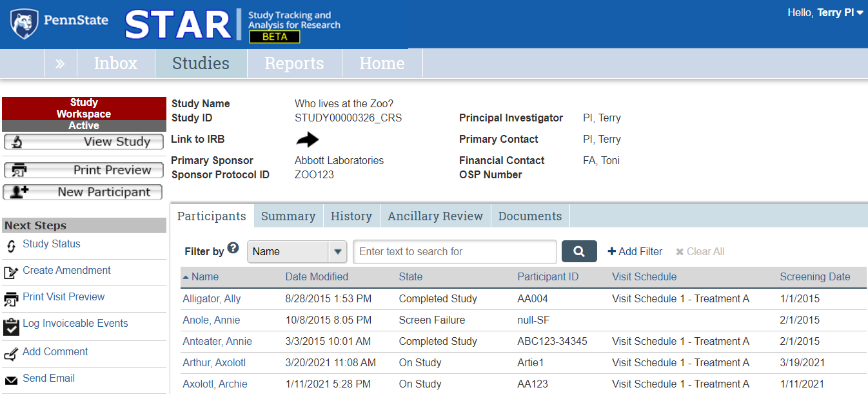
The Participants tab
Summary Tab
General summary information about the study.
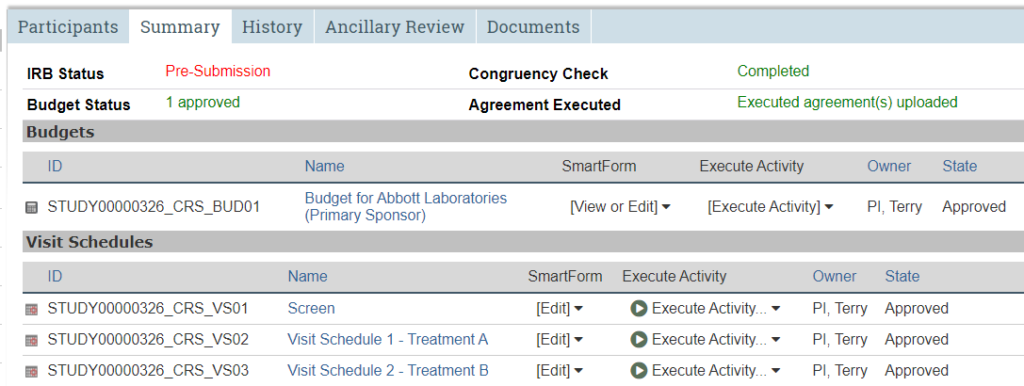
The Summary tab
History Tab
Chronological log of all study actions and activities.
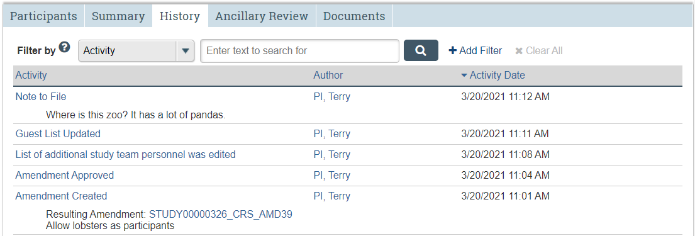
The History tab
Ancillary Review Tab
Tracks requests and responses for ancillary reviews.
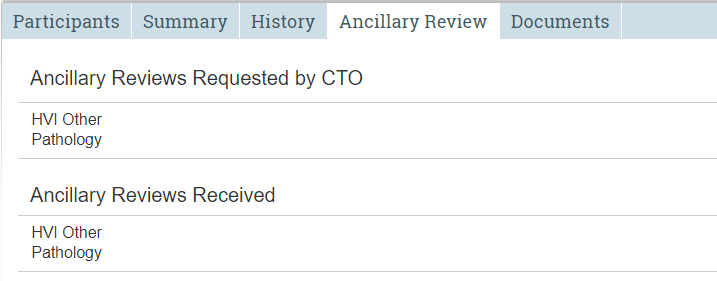
The Ancillary Review tab
Documents Tab
Repository for study documents uploaded to STAR.
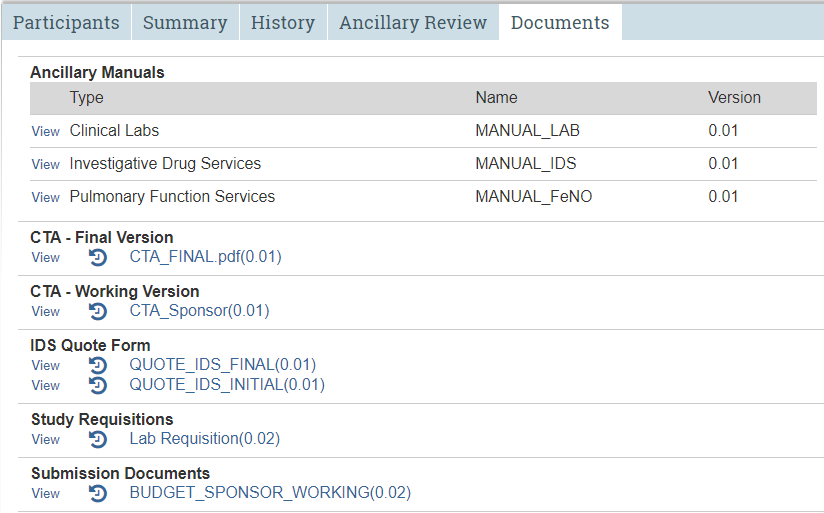
The Documents tab
If more than one version of the same document has been uploaded to STAR, only the most recent version will appear here. (Reminder: The study protocol and informed consent(s) reside in IRB. Budget documents reside in the Documents tab in the budget workspace.)
“Next Steps” buttons appear along the left side of the screen. The items in this section will change based on the study’s current study state. Next steps available in the study workspace include:
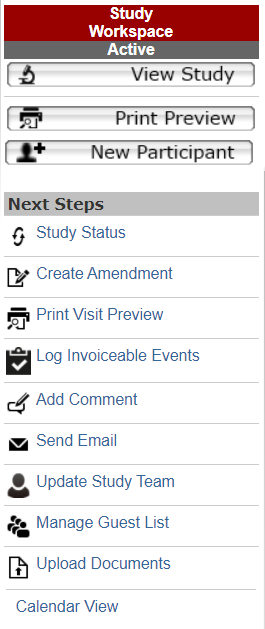
Study Status
Allows the study team to keep the status of the study up-to-date via the following options:
- Put Study “On Hold”: If study is active, no new participants can be enrolled, follow sponsor directive for management of current participants.
- Close Study to Enrollment: No additional participants can be enrolled, follow sponsor directive for management of current participants.
- Suspend Study: Study has been halted, no participant or protocol activities permitted.
- Close Study: No further participant or protocol activities permitted, invoicing actions may occur.
Create Amendment
Create an amendment to the study.
Log Invoiceable Events
Notify finance to add an item to a future invoice.
Manage Guest List
Add or remove individuals to have read-only access to the study.
Update Study Team
Add or remove individuals as study team personnel (with permission to edit data).
Request CTO Action
Send a request to CTO to place study on hold or cancel study.
Send Email
Allows the user to select recipients associated with study, enter a message, provide attachment(s), and send to recipient’s Penn State Health Outlook account.
Add Comment
Upload a comment and attachments.
Print Visit Preview
Print a list of expected items and services for all screening visits for a particular study.
Submit
Submit new study (or clarifications) to CTO for review.
Upload Documents
Upload documents into STAR (e.g., ancillary manuals, IDS quote forms, study requisitions).
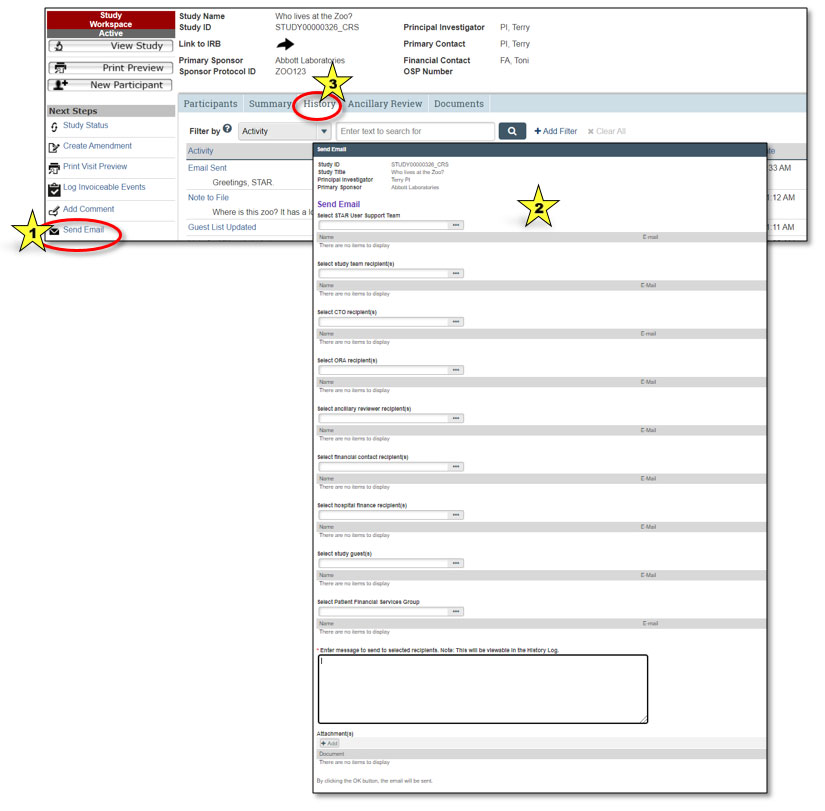
Users can send an email from STAR to selected users associated with a study. Selecting the “Send Email” button under the Next Steps section (indicated by star 1 in the graphic above) will bring up a dialog box allowing the user to select recipients, add text and provide attachments (indicated by star 2). The email will be sent to the Penn State Health Outlook email account associated with each user.
Note: The content of the email will be viewable by all those with permission to view the study, not just the recipients. STAR emails reside under the History tab of the study workspace (indicated by star 3).
There are several ways to navigate in STAR. Methods vary based on which section of STAR you are in. Here are some examples:
Banner Links

The STAR banner appears on each page in STAR. Links on the banner include: Inbox, Studies, Home, Logoff, and the Breadcrumb Navigation Aid (indicated by the star in the image above).
Breadcrumb Navigation Aid

Located to the left of the Inbox link is the Breadcrumb Navigation Aid. Clicking on the double arrow link will expose the breadcrumb trail.
In the example image above:
- Clicking on Studies will take the user to the STAR Studies tab.
- Clicking on Who lives at the Zoo? will take the user to the study workspace for that study.
- Clicking on Arthur, Axolotl will take the user to the participant workspace for that participant.
- The Screen 3/19/2021 for Participant… item (and the last link in any of the breadcrumbs) shows the user’s current location.
“Filter By” Function
The “Filter By” function in STAR serves as a search function. It is available on several screens in STAR.
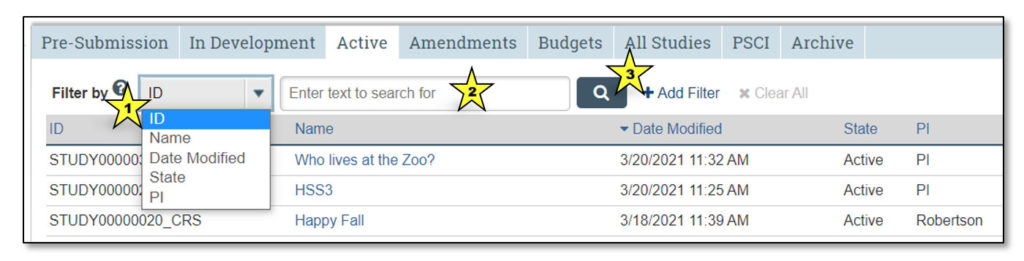
Users should:
- Select the identifier they would like to use from the dropdown menu (indicated by star 1 in the image above)
- Enter the text they would like to find in the search box (indicated by star 2)
- Click on the magnifying glass “search” icon (indicated by star 3)
Alternatively, users may perform a more advanced search by selecting “+ Add Filter” to enter additional search criteria.
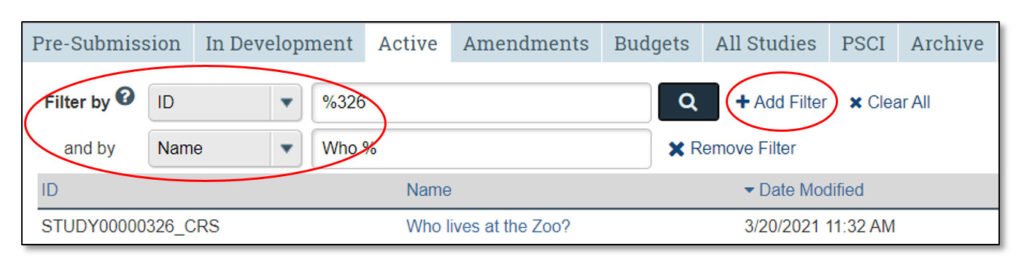
When filtering, users may perform a “wildcard search” by entering a portion of the search phrase and using the “%” sign to substitute for any characters. For example, if filtering by ID, entering %79 will return the following results: STUDY0079, STUDY00179 and STUDY00279.
Page Advance
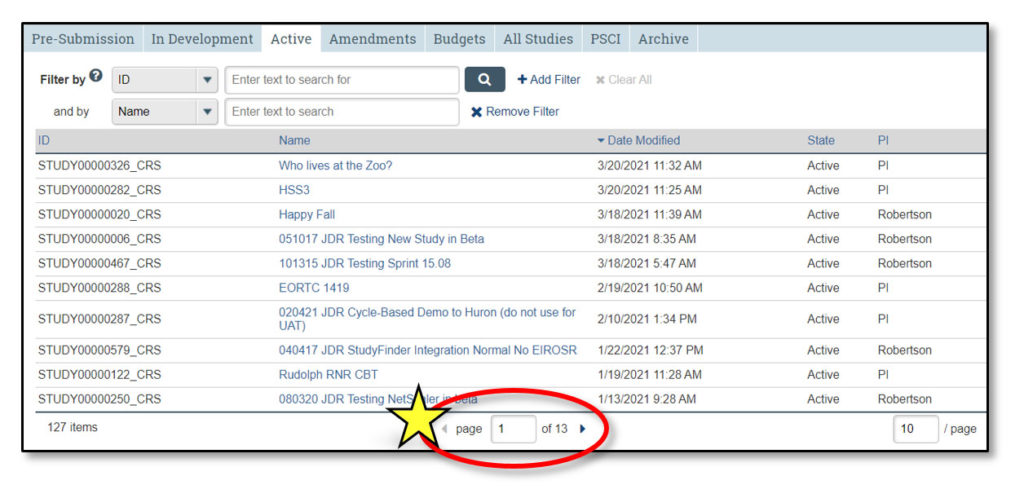
Use the arrows at the bottom of the screen to navigate to additional pages.
Screen/Page Navigation
Some forms span multiple pages. Proceed through the pages by either clicking the “Continue” button or selecting the “Jump To” option to navigate directly to a particular page.
1. Back
Returns user to previous page; information entered is not saved.
2. Center menu
- Save: Saves information entered into the page.
- Exit: Exits the screen and returns user to study workspace; user will be asked if they wish to save.
- Hide/Show Errors: Displays errors related to information entered (e.g., missing required information). The errors will appear at the bottom of the screen. Click “Hide/Show Errors” again to remove them from view.
- Print: Displays user-friendly print preview option.
- Jump To: Brings up the “Jump To” dropdown menu.
3. “Jump To” dropdown menu
Allows user to directly access any page. The current page is displayed in red; pages pertinent to the user’s role are black; pages not relevant to their role are grayed out.
4. Continue
Advances user to next page.
Help Buttons
Blue circular help buttons with a question mark icon are available throughout STAR. When clicked on, they provide additional information in the form of help text, which is green. Clicking on the help button again hides the help text.

Study and budget documents can easily be uploaded to STAR. Documents can be uploaded either on the relevant pages, or at any time by selecting Upload Documents or Upload Budget Documents from the Next Steps menu in the associated workspace.

An example of a place to upload documents on a relevant page in STAR.
Document Naming Conventions
For consistency, all documents must be uploaded using the document titles found on the STAR Document Naming Chart. The chart is readily available by clicking on the hyperlink labeled Link to Document Naming Chart, located wherever documents can be uploaded.
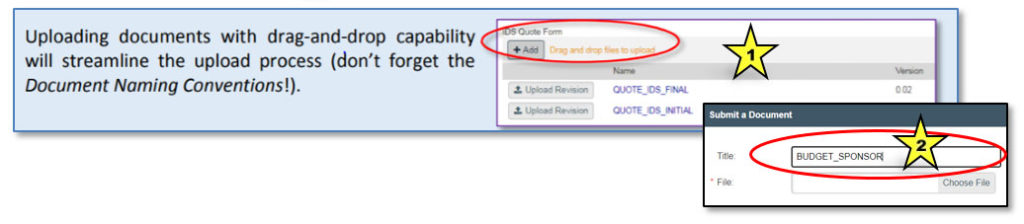
Adding a Document
To upload a document, click on the “Add” button or, where available, use “drag and drop” to upload a file (indicated by star 1 in the image below). The appropriate document title (from the Document Naming Chart) must be entered into the “Title” field of the “Submit a Document” dialog box (indicated by star 2).
Multiple Documents of the Same Type
If more than one of the same group of document exists (e.g., multiple laboratory manuals), each one should be uploaded with the title from the Document Naming Chart followed by the # sign and a sequential number (e.g., “MANUAL_LAB#1,” “MANUAL_LAB#2,” etc.).
If there are multiple types of a document (for example, multiple types of informed consent forms), each document should be uploaded as listed in the STAR Document Naming Chart, followed by an underscore and a descriptor (e.g., “ICF_Main,” “ICF_PK,” “ICF_Pregnancy,” etc.).
Document Revisions
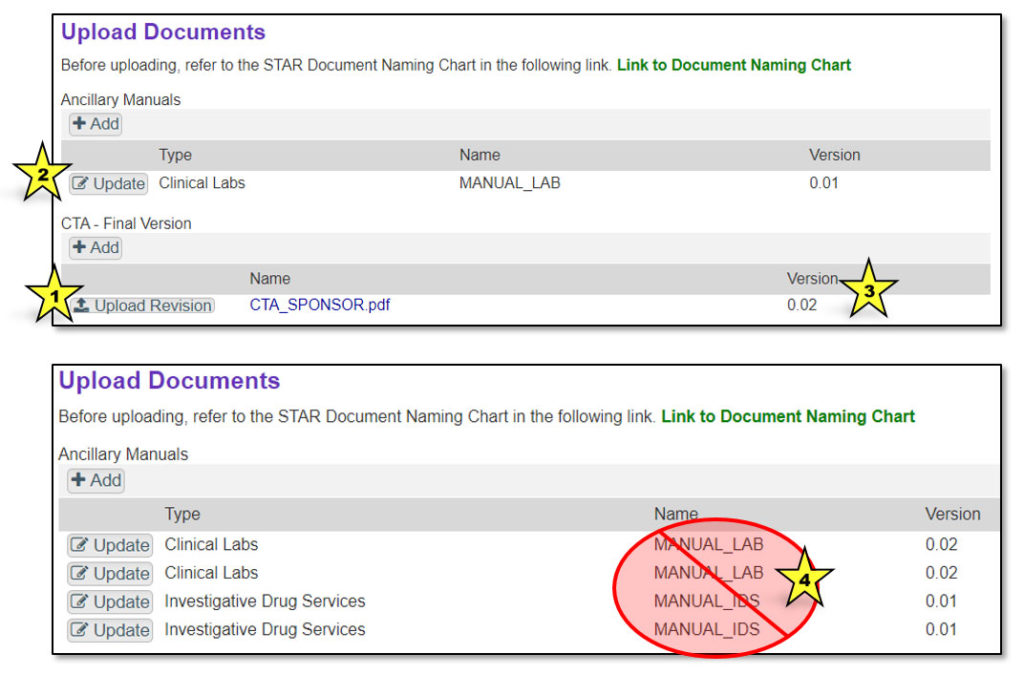
If a more recent version of a document needs to be uploaded to STAR, click the “Upload Revision” button (indicated by star 1 in the image below). For ancillary manuals, first click “Update” (indicated by star 2). Uploading a revision will advance the version number (indicated by star 3). Be sure to upload a revision when uploading an existing document. Do not upload a new document with the same name, or multiple documents with the same name will appear in the “Documents” tab (indicated by star 4).
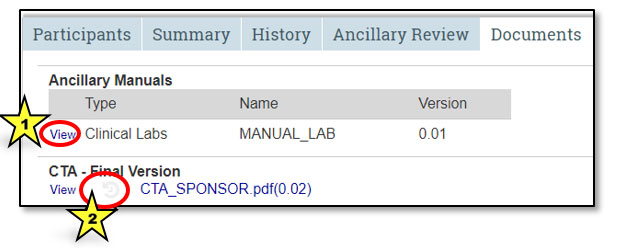
Document View and History
From the Documents tab in the study workspace, view a document by clicking on the View hyperlink (indicated by star 1 in the image below). Clicking on the history image (indicated by star 2) will bring up a dialog box that displays all versions previously uploaded to STAR. It includes the date/time the document was uploaded, the name of the uploader and the title of the original document. To locate the history link for ancillary manuals, first click on View. Remember, clicking on the document name hyperlink will open that document.
Troubleshooting
To see blocked pop-ups for a site using Chrome on desktop, follow these steps:
- If pop-ups have been blocked, a small page icon with an X at the bottom right will appear in the address bar. Click this icon to see a list of the blocked pop-ups.
- Click the link for the relevant pop-up window.
- To always see pop-ups for the STAR site, choose “Always show pop-ups from (site).” This will add the STAR site to the exceptions list for Chrome, which can be managed in Chrome’s Content Settings dialog.
To manually allow pop-ups from the STAR site, follow these steps:
- Choose the Chrome menu (three dots) from the browser toolbar.
- Choose Settings.
- Choose “Show advanced settings.”
- In the Privacy section, choose the “Content settings” option.
- In the Pop-ups section, choose “Manage exceptions.”
Glossary of Terms
The blue strip along the top each STAR page. It includes the STAR logo and links to the Inbox, Studies Page, STAR Home Page and Logoff.
STAR page that displays a list of studies that currently require action or attention on the part of the user.
The study a budget or visit schedule is associated with.
Each user is assigned a role in STAR. Permission to view and/or edit information in STAR varies based on a user’s role. Roles include:
- Study team
- Principal investigator
- Clinical Trials Office
- Ancillary reviewer
- Office of Research Affairs
- Financial contact
- Hospital finance
- Guest (read-only)
Dynamic webpage that contains links to the live STAR site, STAR resources, STAR calendar, STAR news, upgrade/downtime information and tips for users. Found at research.med.psu.edu/star.
The study number used in STAR is the same as the IRB study number.
Page in STAR that allows users to view all of the studies to which they have access. For purposes of convenience, the page contains tabs that categorize the studies by their various states in the STAR study life cycle (Pre-Submission, In Development, Active, Amendments, Budgets, All Studies, PSCI, Archive).
The study state describes the current state of the study. It will also be displayed in the upper left corner of STAR (in a gray box) directly below the red study workspace box. Each workspace has unique study states. Study states from the study workspace (in order of progression) include:
Pre-Submission
Study is initiated in STAR by the study team, but not yet submitted for CTO review.
(Action required by the study team.)
CTO Pre-Review
Study information has been submitted by the study team and is awaiting review by CTO.
(Action required by CTO.)
Study Team Clarification
Information has been submitted to CTO by the study team, but needs corrections/additions.
(Action required by the study team.)
Feasibility Review
Protocol and budget information are being reviewed by CTO.
(Action required by CTO and/or study team.)
Awaiting Ancillary Review
Study awaiting review by ancillary department(s).
(Action required by ancillary department(s).)
Awaiting Activation
Study awaiting completion of four items in order to progress to “Active” state:
- IRB approval
- Budget completion
- Congruency check
- Executed sponsor agreement
(Action required by CTO, study team, IRB, ORA and/or sponsor.)
Active
Study is active. Participant information can be entered.
(Action by CTO or study team possible.)
Study on Hold
Study is on hold.
(Action by CTO or study team possible.)
Study Canceled
Study has been canceled. This cannot be undone; a new study will need to be created.
Archived
Study has been closed and archived.
The workspace is a section of STAR that focuses on a particular topic. Items related to the topic can be viewed and/or edited in the appropriate workspace.
The current workspace will be displayed in the upper left corner of STAR in a uniquely colored box.
Workspaces include:
- Study workspace (red box)
- Budget workspace (green box)
- Participant workspace (purple box)
- Visit schedule workspace (teal box)
- Visit workspace (pink box)
- Invoice workspace (orange box)
Summary: Keep it Simple - Getting STARted
- STAR is a centralized, comprehensive web-based system for clinical research studies.
- A STAR submission is required for studies that will have items captured in the hospital billing system and for which invoices will be generated.
- Google Chrome is the preferred browser for using STAR.
- The STAR webpage has links to resources and quick tips.
- Log in to STAR using Penn State Access ID and Duo 2FA.
- Inbox lists studies that need the user’s attention (indicated by star 1 on the image above).
- Studies page lists all studies to which the user has access (indicated by star 2).
- The study workspace lists info about a particular study (indicated by star 3).
- A log of all action and activities related to a study can be found under the History tab (indicated by star 4).